Contents
- Overview
- Technical Contributions
Overview
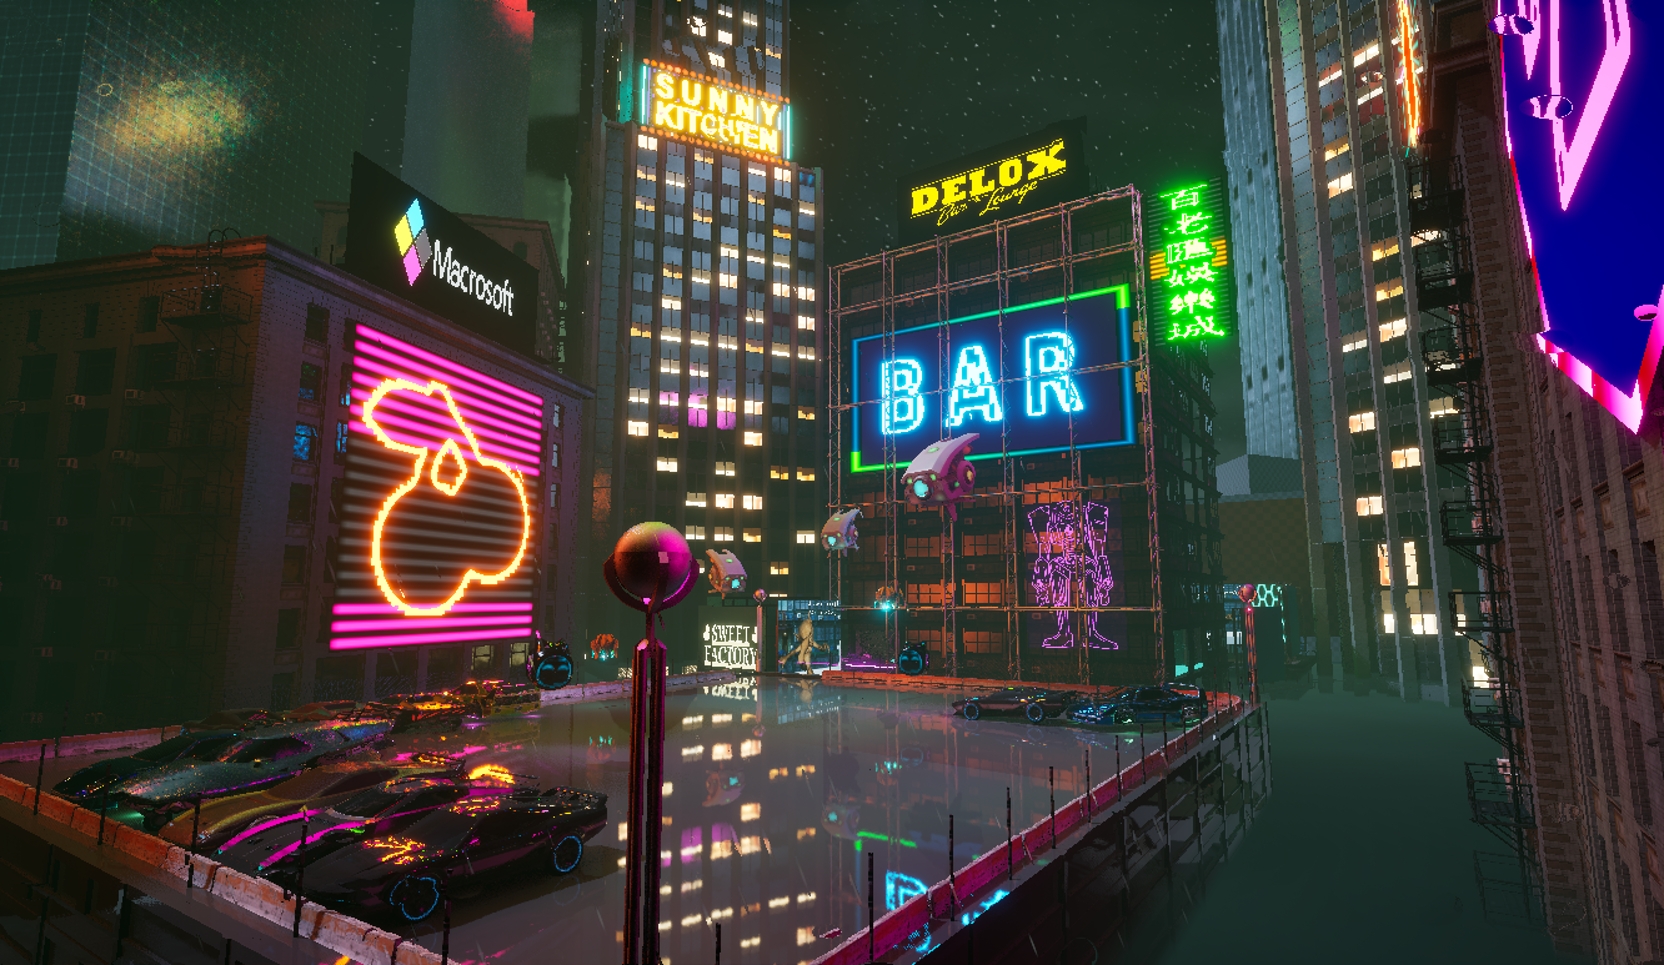
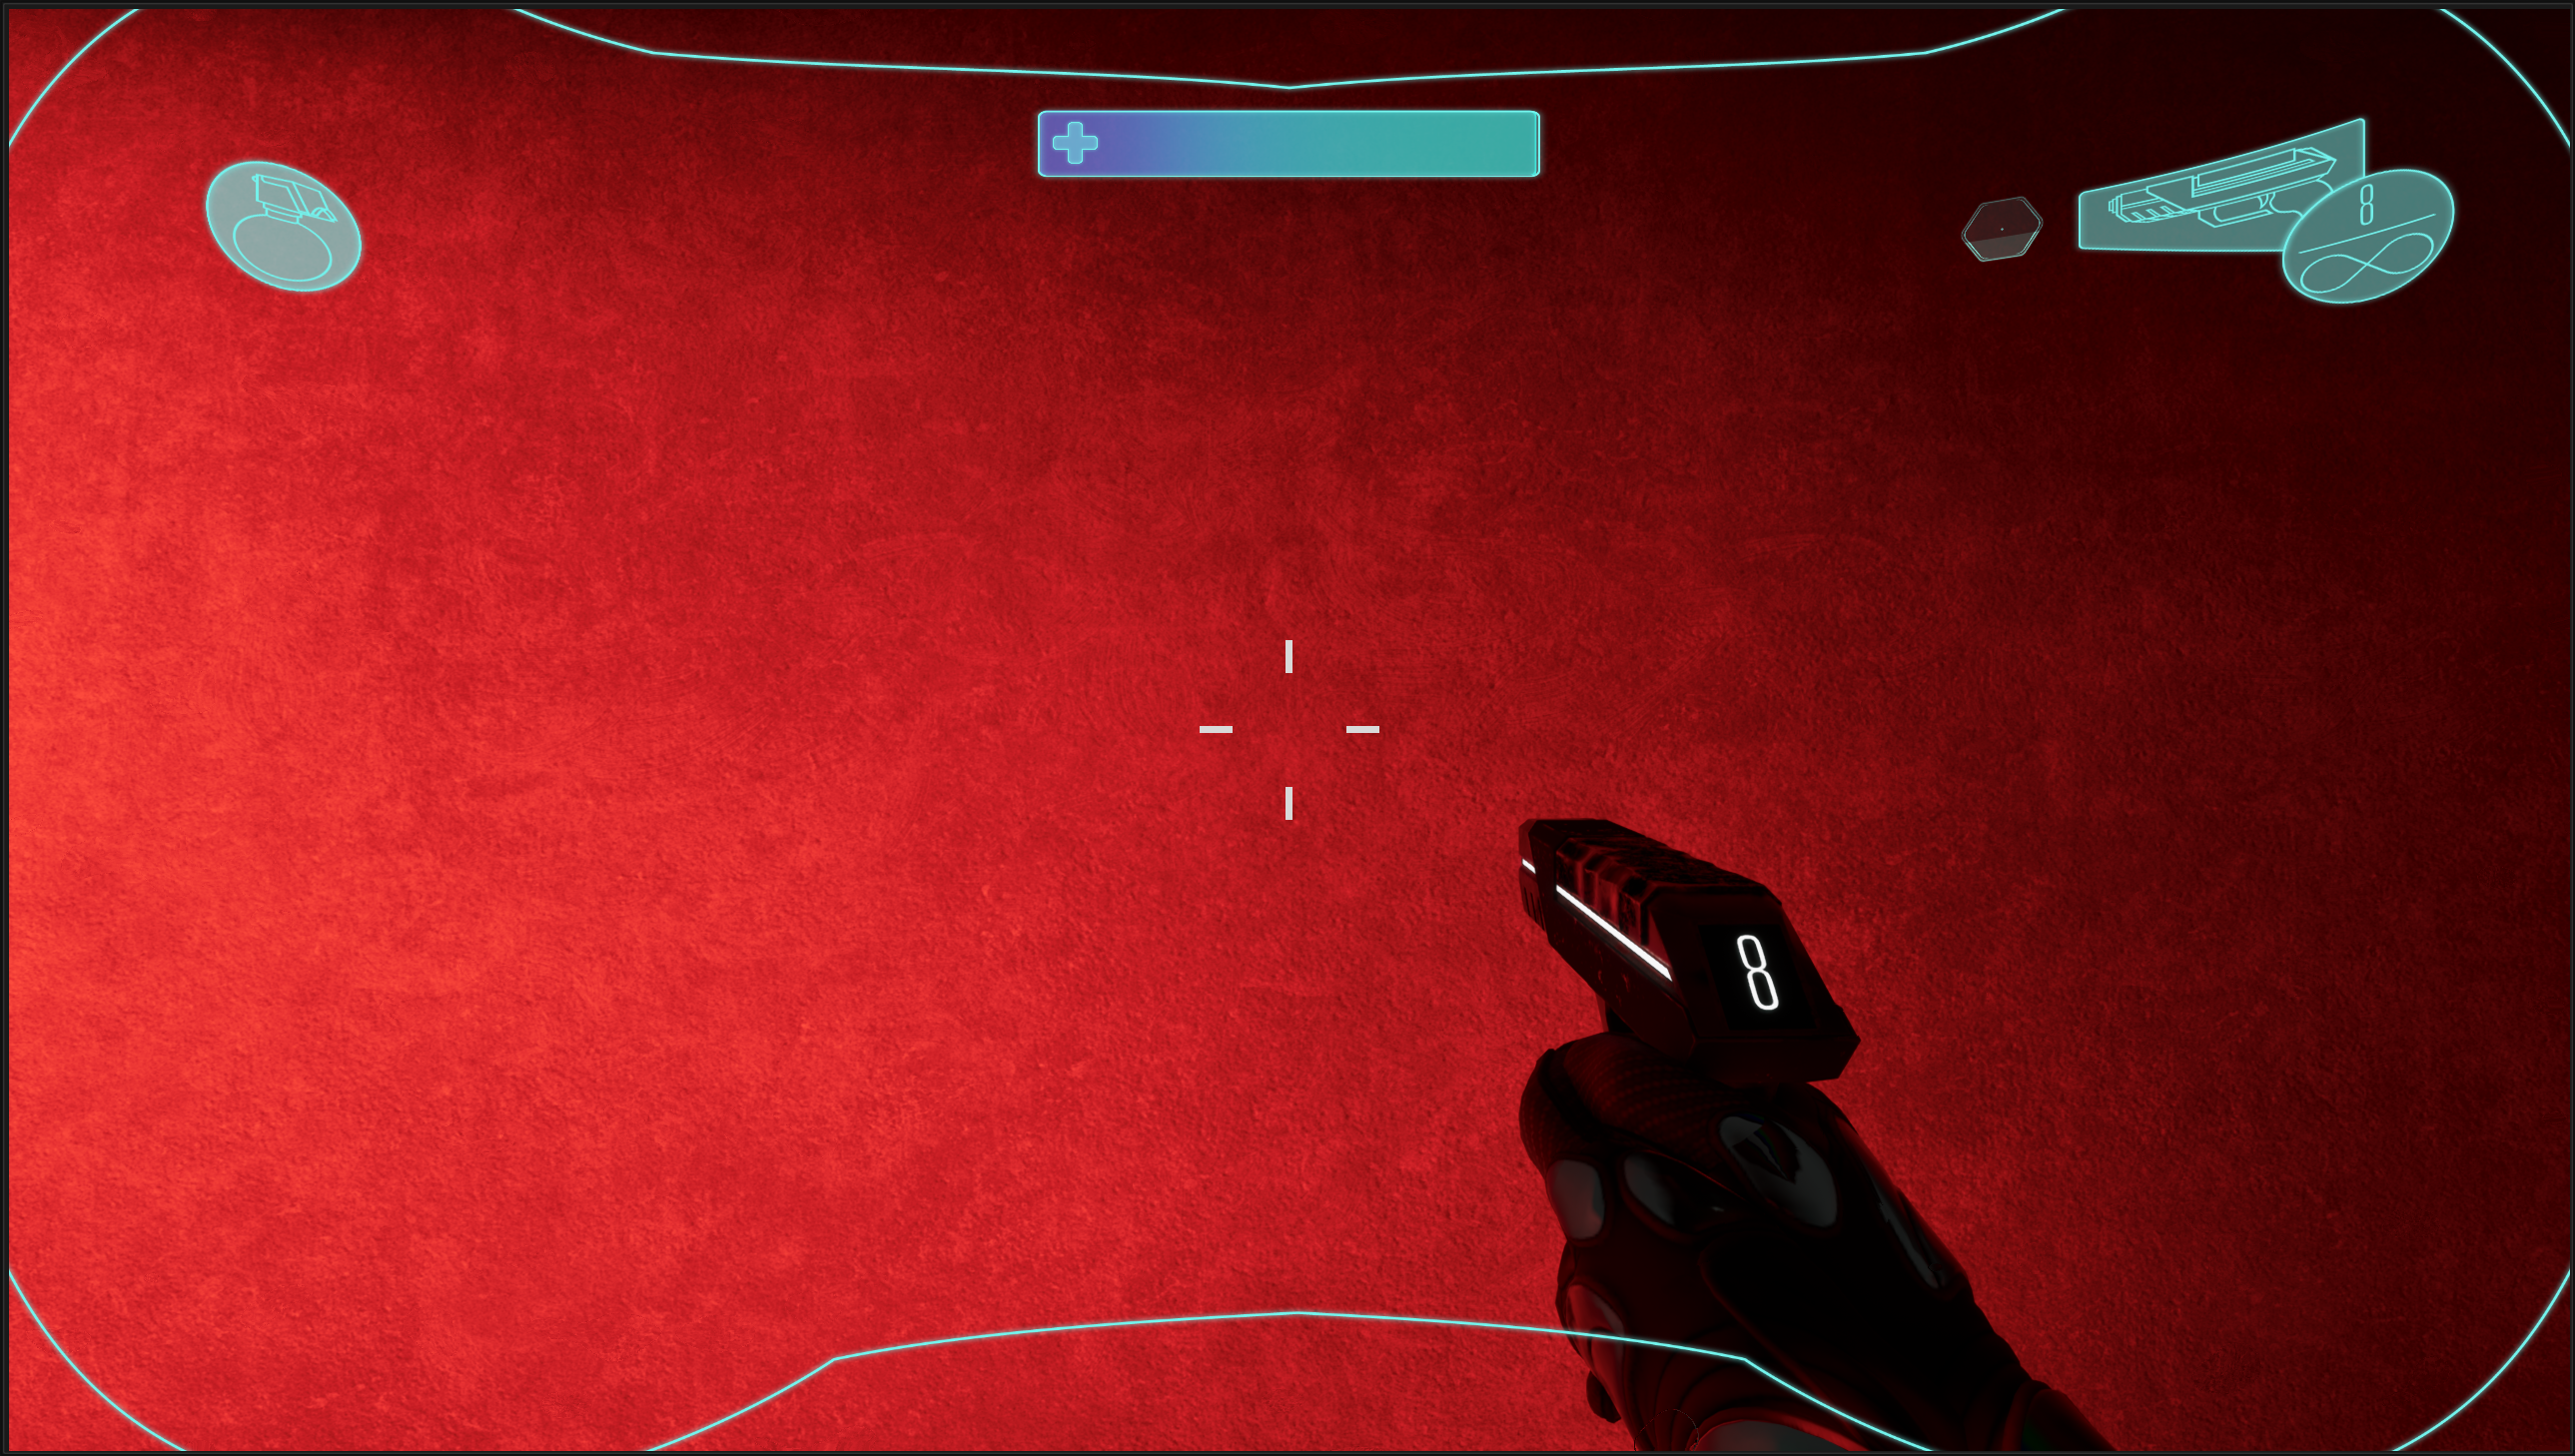
Project Mercury was developed by a team of 14 people over the course of 6 months. The goal of the game was to create a fast-paced first person shooter game that would allow us to gain experience working with Unreal Engine 5. For the most part, this was the first experience any of us had had with an engine outside of Unity. We were inspired by games like Titanfall 2, Mirror’s Edge, and Ghostrunner, and decided to create a game particulary inspired by the technical movement mechanics present in those titles. Project Mercury is an adreneline-inducing mix of run and gun action against the backdrop of the rainy neo-futuristic late 21st century Detroit skyline.
Technical Contributions
I worked as a general programmer for Project Mecury, but mainly worked on systems programming or lower level components written in C++. My contributions include:
-
A robust, complete, and polished character controller. Since a main focus of our game’s identity and feel was the presence of an intuitive and polished movement system, I was entrusted to develop, implement, and iterate on our first person character controller. Over the development cycle, this was my most important task.
-
A reusable and extensible throwable items system, used for the 4 different types of grenades in Project Mercury; two for the player’s use, and two for the enemies’.
-
A complete and polished special skill, inspired by the Deadeye ability from Read Dead Redemption 2 and Cassidy’s High Noon Ultimate from Overwatch. This is accompanied by a reactive points system that tracks and charges up based on the player’s ability to maintain their momentum through the level.
And several other miscellaneous tasks.
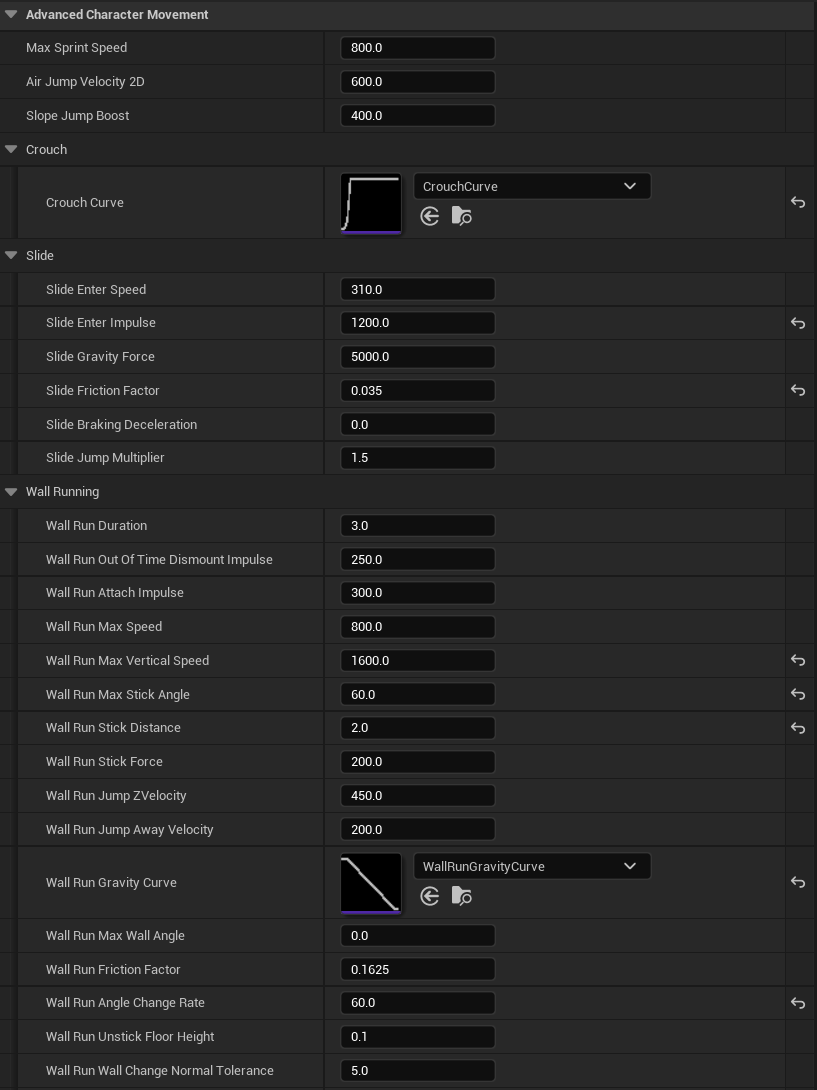
Advanced Movement
In a first person game, the character controller is an oft overlooked factor in the overall feeling of fun and polish apparent to players. It affects nearly every single interaction they have whilst playing, yet a good first-person controller should be as intuitive as possible, and far from the front of the player’s mind. If the player notices the controller, it’s likely because it behaved in way that was not intended by their inputs. This only serves to interrupt their immersion and flow, and is a trademark of poorly programmed games.
Reverse Engineering
In order to develop an excellent movement component, we looked towards a game with one of the most loved movements systems - Titanfall 2. My work on the character controller for this game could be summarized as trying to reverse engineer what made Titanfall’s movement so fluid and addicting.
This was an ongoing process, but I learned so much about how the creators of that game implemented their iconic parkour system, and I took what I learned to create a stripped-down and simplified, but still fun, version into our game.
Features
Wall-running
Wallrunning occurs whenever the player is falling towards an appropriately angled wall. A circular raycast method allows for free aiming while running.
Crouching and Walking
Crouching is a custom implementation that smoothly changes the player’s collider for the best accuracy.
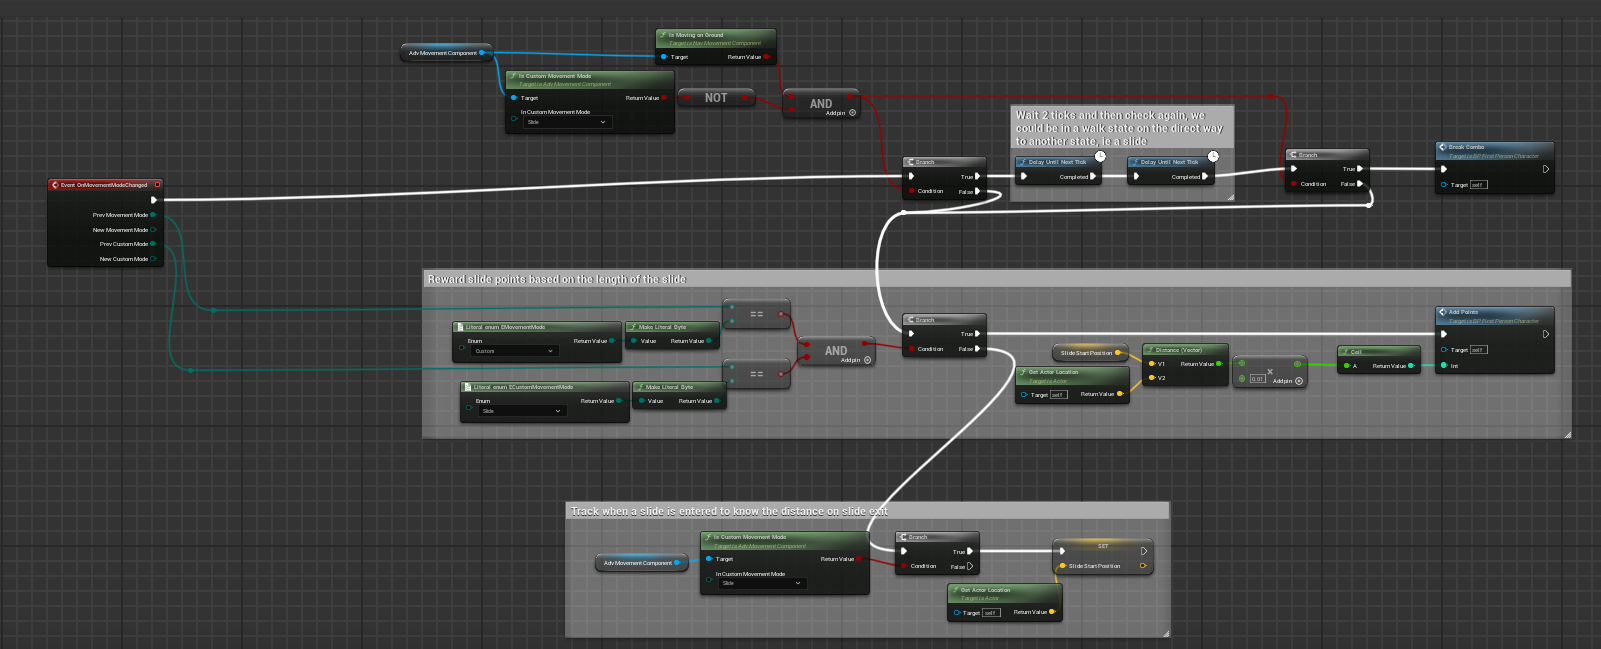
Sliding
Sliding is a physics-based implementation that gains speed down slopes. Slide jumping gives a quick burst of vertical mobility.
Mantling and Vaulting
Mantling and vaulting allow for smoothly moving about the level without getting tripped up on level geometry.
Wall Running Technical Breakdown
The most important aspect of the movement system in Project Mercury is the wallrunning. It’s logic begins here:
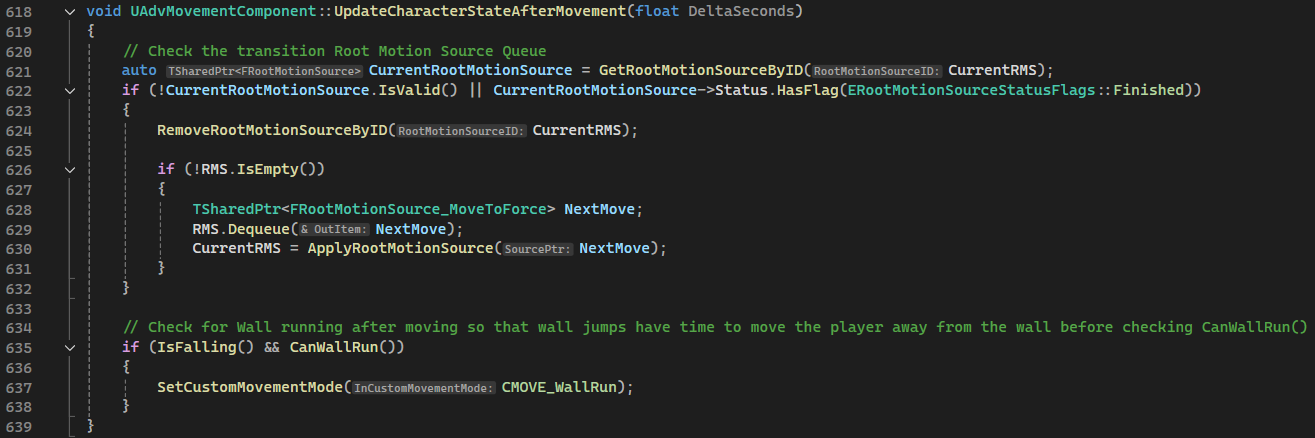 The base class implementation of the CharacterMovementComponent executes this function at the end of every frame to see if the current movement mode has changed. If the character is falling, and the the
 CanWallRun function returns true, the state is changed to initiate a wallrun.
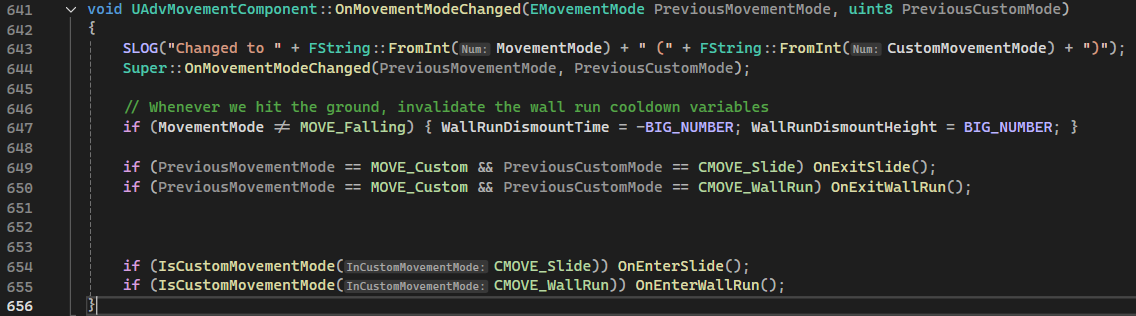 Another funtion that is executed every frame,
 OnMovementModeChanged, then runs the OnEnterWallRun function. Notice also how when the state changes away from CMoveWallRun, the OnExitWallRun function will likewise be called.
 This architecture ensures that the state of the system is properly managed. Any code that needs to be executed at the start or end of a movement mode can be placed here, and it will run, regardless of how many possible places the movement mode could begin or be cancelled at.
Continuing on with the code, the base class executes the
This architecture ensures that the state of the system is properly managed. Any code that needs to be executed at the start or end of a movement mode can be placed here, and it will run, regardless of how many possible places the movement mode could begin or be cancelled at.
Continuing on with the code, the base class executes the PhysCustom function due to being in a derived class movement mode. The override PhysCustom then just needs to forward to a dedicated Phys* function depending on the specific movement mode.
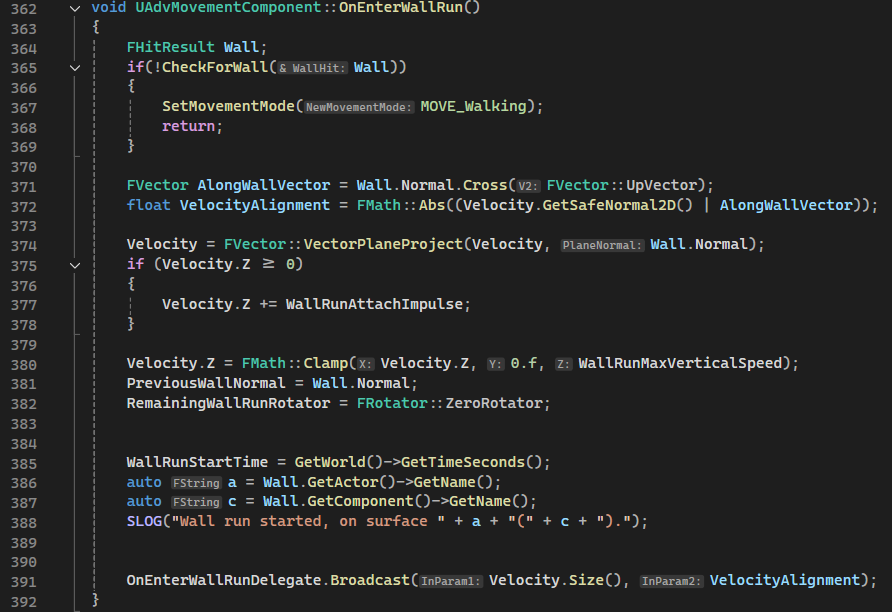
 At long last, the code finally reaches the code that actually wallruns the player,
 PhysWallRun.
The function itself is long, so only the important sections are shown here.
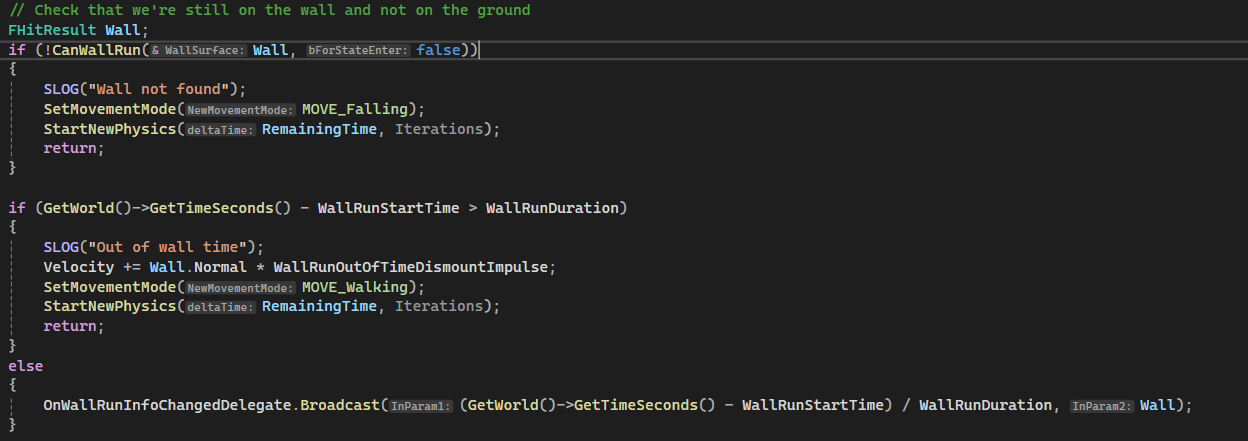 Firstly, the code re-checks that the conditions for starting a wall-run are still being met. It also checks here to see how long has elapsed since the wallrun started, and exits the move mode if the allotted wall run time has expired;
 Then, the player’s acecleration and velocity are projected onto the plane of the wall. This is what sticks the player to wall so they don’t come off of it unless they indend to.
Here is also shown how the gravity is applied based on the altitude of the player’s view direction. That is, they’ll continue moving at the same height on the wall, unless they look downwards. This prevents the very unituitive situation where the player is looking down and holding the forward input, but moves upwards relative to the camera.
Then, the player’s acecleration and velocity are projected onto the plane of the wall. This is what sticks the player to wall so they don’t come off of it unless they indend to.
Here is also shown how the gravity is applied based on the altitude of the player’s view direction. That is, they’ll continue moving at the same height on the wall, unless they look downwards. This prevents the very unituitive situation where the player is looking down and holding the forward input, but moves upwards relative to the camera.
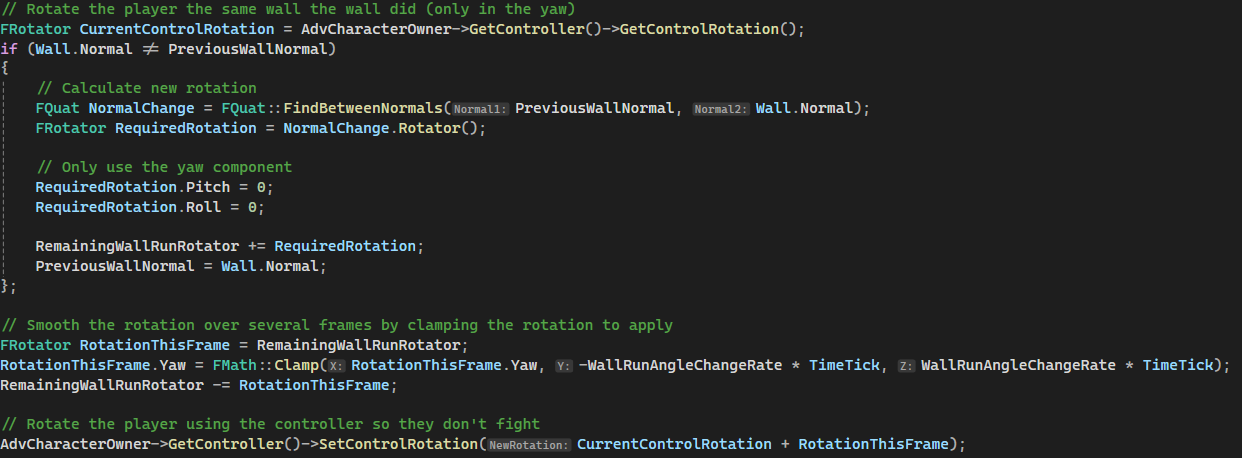 Another nice feature of this wallrunning implementation is that the player is gently rotated while running, such that their look direction stays the same relative to the part of the wall they’re currently contacting. This removes the need to move the look input while running around a curved wall, and creates the feeling of being carried around the turn by the wall.
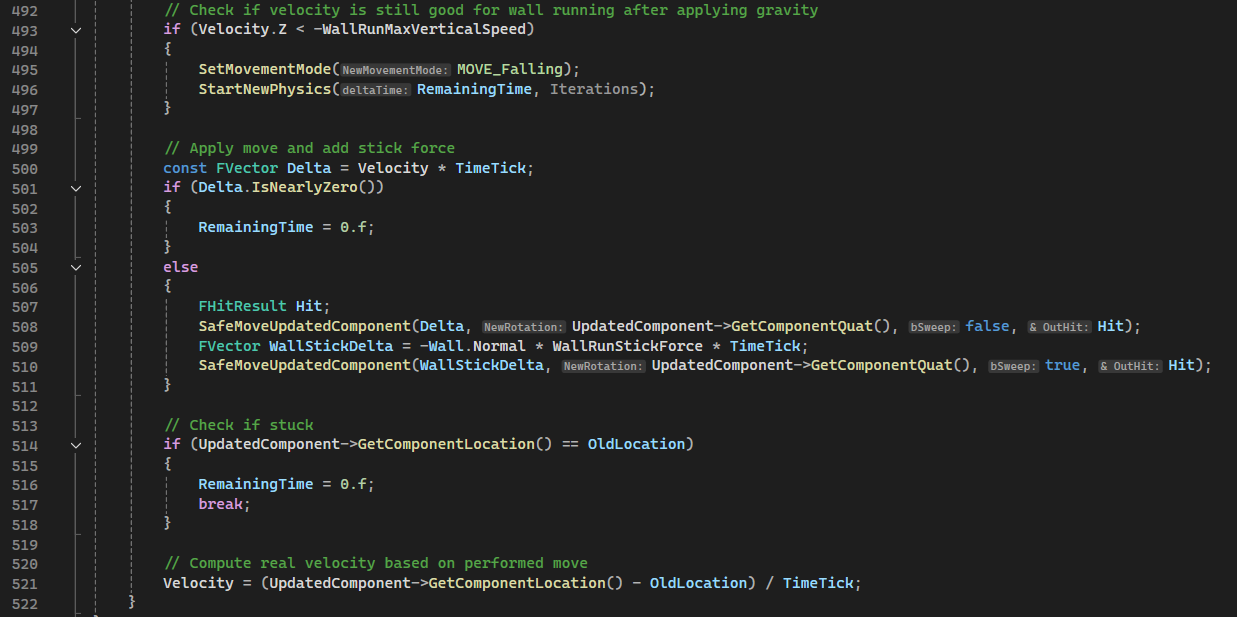 The actual movement portion of this movement mode is very succint. Other than some minor checks and safe-guards, the player is moved by their velocity in the direction of their acceleration (which are now both clamped to be in the plane of the wall) and one additional stick force is applied into the wall. This is to ensure contact with the wall remains even when running a sharp concave surface.
Lastly, one of the more important parts of this system to recreating the feel of Titanfall 2 is the specific conditions that must be met and/or remain met in order to wall run.
The actual movement portion of this movement mode is very succint. Other than some minor checks and safe-guards, the player is moved by their velocity in the direction of their acceleration (which are now both clamped to be in the plane of the wall) and one additional stick force is applied into the wall. This is to ensure contact with the wall remains even when running a sharp concave surface.
Lastly, one of the more important parts of this system to recreating the feel of Titanfall 2 is the specific conditions that must be met and/or remain met in order to wall run.
 The
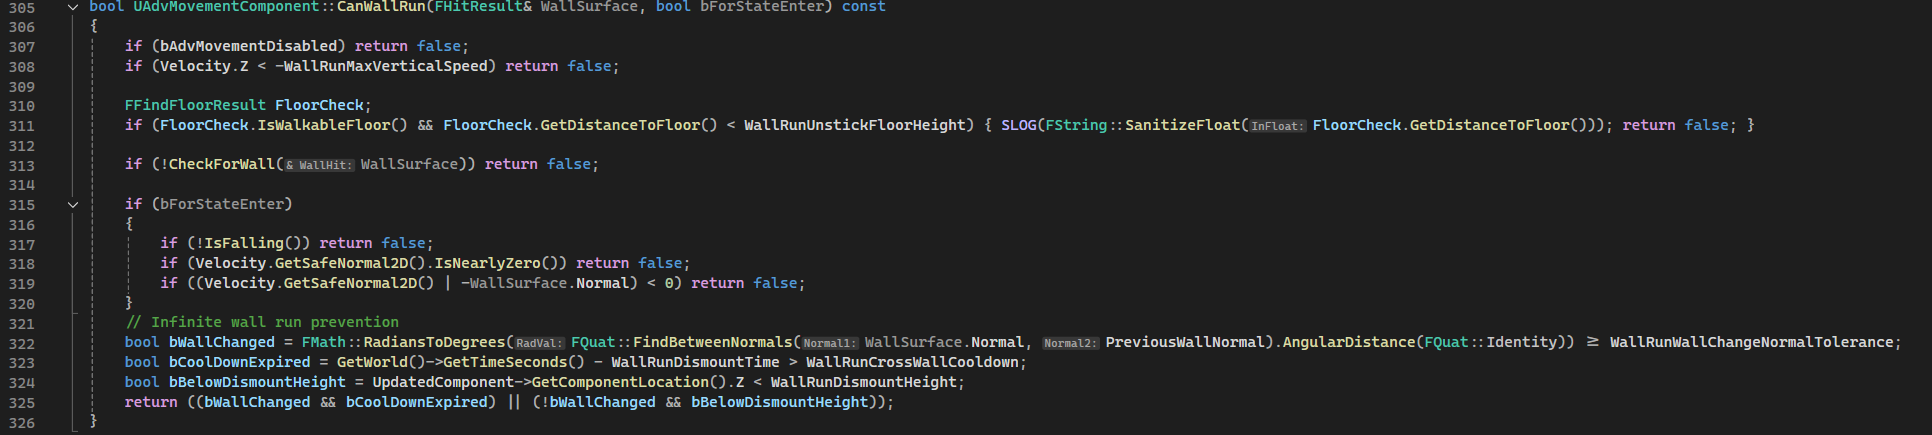
The CanWallRun function is responsible for checking the current state, and determining whether a wall run can be started. It ensures that the player is not on the ground and falling down. It then forwards the check to see if the player is up against a suitable wall to the CheckForWall function, which returns a UE5 FHitResult struct with all of the information of the best successful raycast for a wall.
It then completes the same logic as Titanfall does to prevent increasing height on the same wall; A change in the wall ran on (approximated by a large change in normal as compared to the last surface the player wall ran on), seeing if enough time has passed since running on this wall, or seeing that the height is lower than previously ran on. This allows for wall running and gaining height by jumping between walls, re-attaching to the same wall if height is not gained, and allows any wall running if the cooldown since the last wall run have expired.
This sort of logic is where the start guards, like OnEnterWallRun and OnExitWallRun are important, to ensure that everything is always in a valid state for logic like to work.
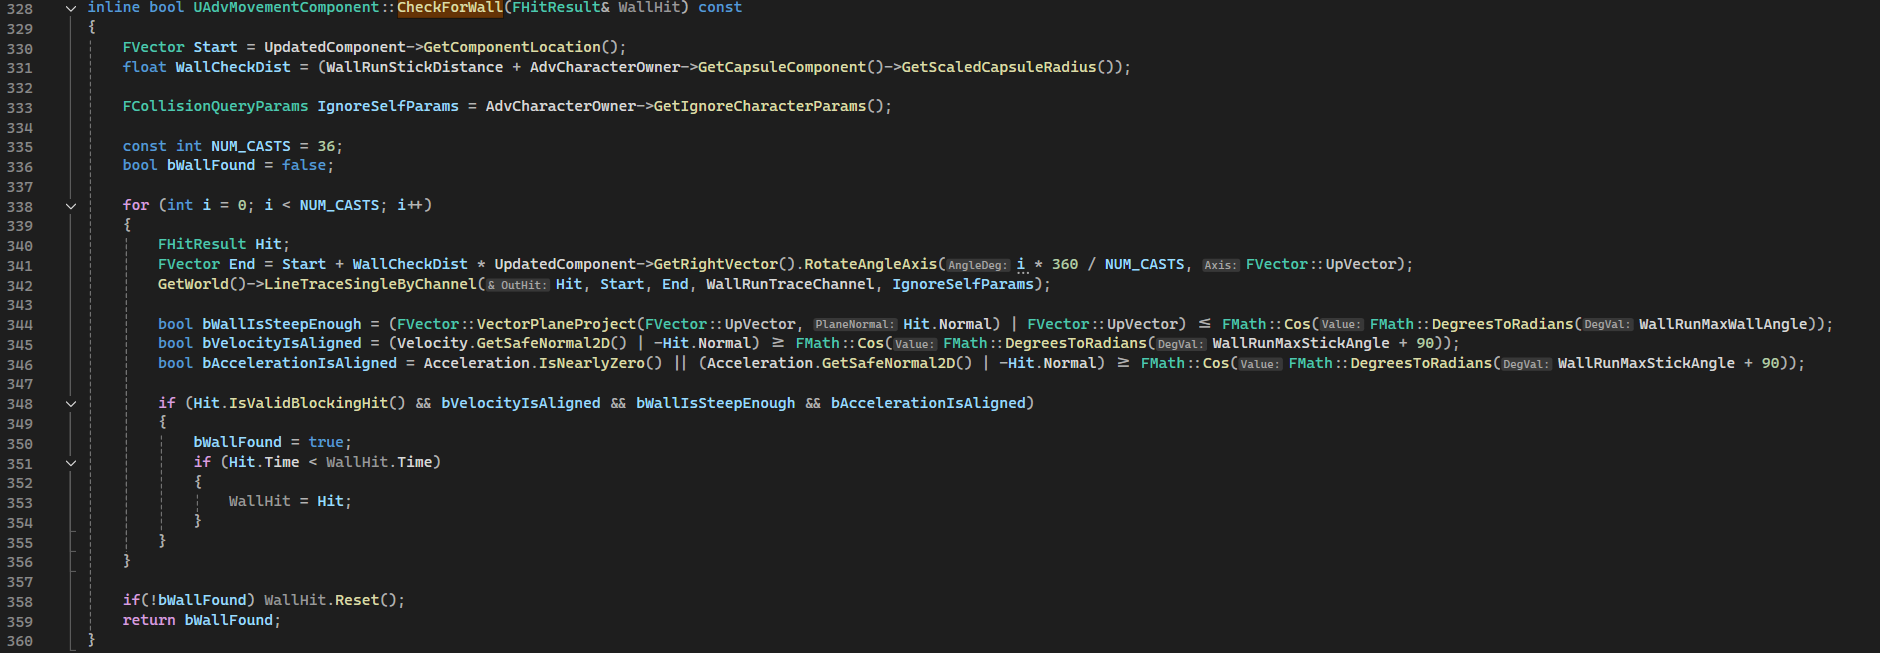 The
The CheckForWall function is likewise important. Rather than simply ray casting left and right like many, many, many wallrunning implementations readily found, this function casts a set number of rays in a circle. This allows for wallrunning without requiring that the player’s look direction be locked directly along the wall. This allows for the same fluidity of looking and aiming when on a wall as there is on the ground.
A raycast that collides a wall is only considered valid if the wall is close enough to vertical and if the player’s velocity and acceleration are both sufficiently pointing into the wall. Of the valid hits in the circle, the closest is selected to represent the current wall.
Developer Extensibility
As I have just shown, the custom character movement component is structured such that adding new movement mechanics could be done very efficiently. A lot of movement mode implementation can follow the same basic pattern of
- Adding a new enum variant to the movement mode enum.
- Creating a
Can*function (or for some actions, aTry*function is more appropriate), which checks the current state, and returns whether the state should be entered, as well as any information gathered necessary to carry out the state. For instance, theCanWallRunfunction has an out-parameter of type FHitResult, which will contain the most success raycast-to-wall hit after it concludes. - Adding a
Phys*function. - Adding any state-tracking in
OnEnter*andOnExit*functions.
Designer Friendly Programming
All of the low-level physics code I created for the movement component is endlessly tweakable and modifiable via UPROPERTYs, so that designer can independently tune in the feel of the component based on player feedback for tight iteration cycles.

Grenade System
Another system I contributed to the project is the grenade system (also called “lethal” system, internally). Developing the grenades gave me the chance to experience creating a highly reusable and adaptable system in Unreal Engine.
LethalSystem Component
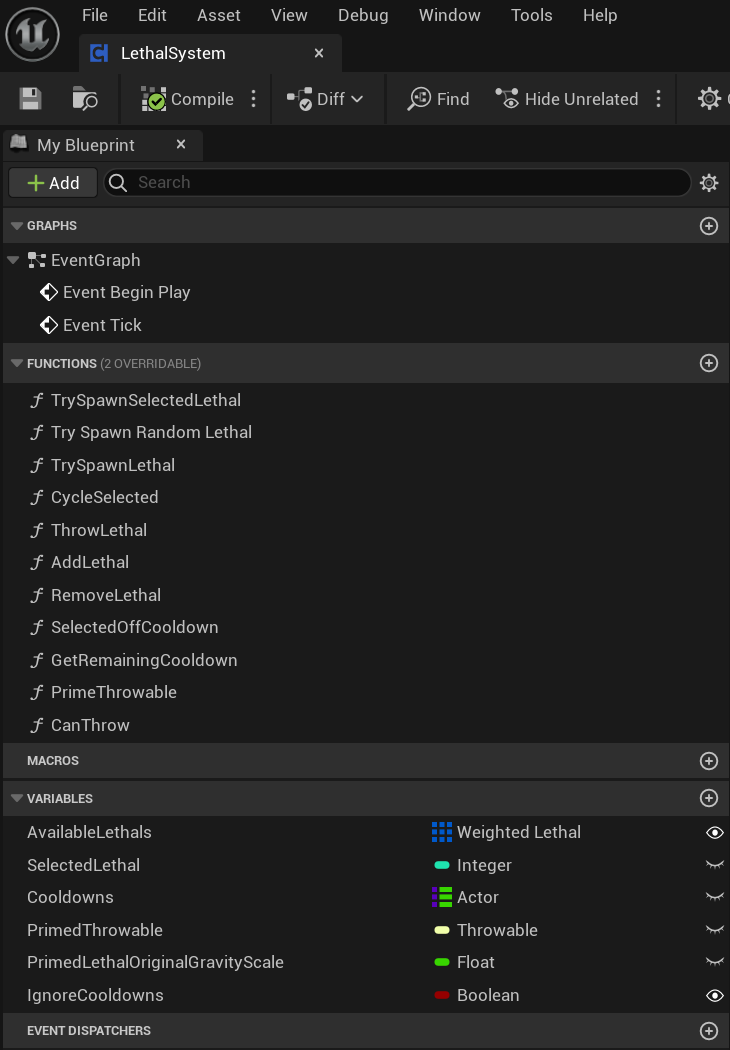 The main driver of the system is the Actor Component,
 LethalSystem. This component represents a user of the grenades and an inventory of sorts, with the concept of a list of available lethals, an index of which one is “selected”, and a map of remaining cooldowns. That list is player-centric, but the LethalSystem also contains all of the methods necessary for using grenades, and can be used without the concept of cooldowns or currently indexed grenade. This makes it perfectly suitable to be re-used for an enemy attack of lobbing grenades, for example.
Where a player class might use the component by changing the selected index and then calling TrySpawnSelectedLethal…
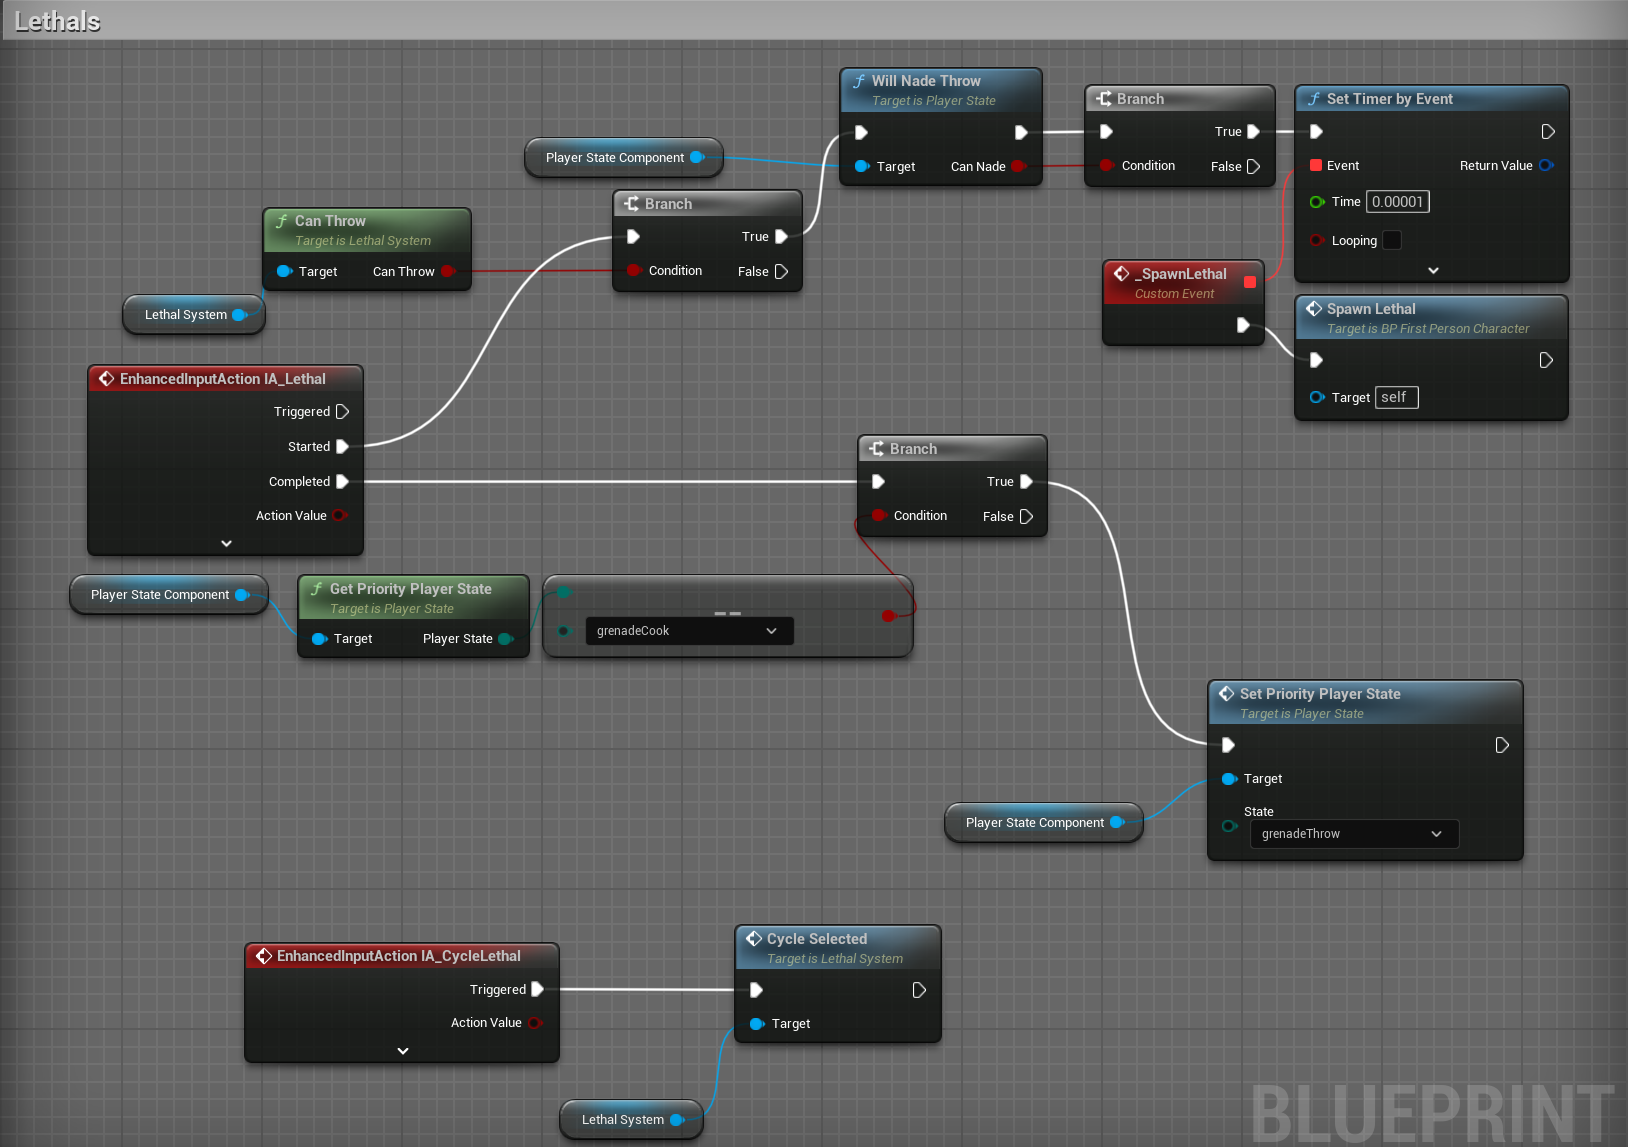 and then at a later time (probably when the player releases whichever button), calling
 ThrowLethal
While an enemy might set the random weighting for its available lethals, set cooldowns ignored, and call TrySpawnRandomLethal and ThrowLethal together…
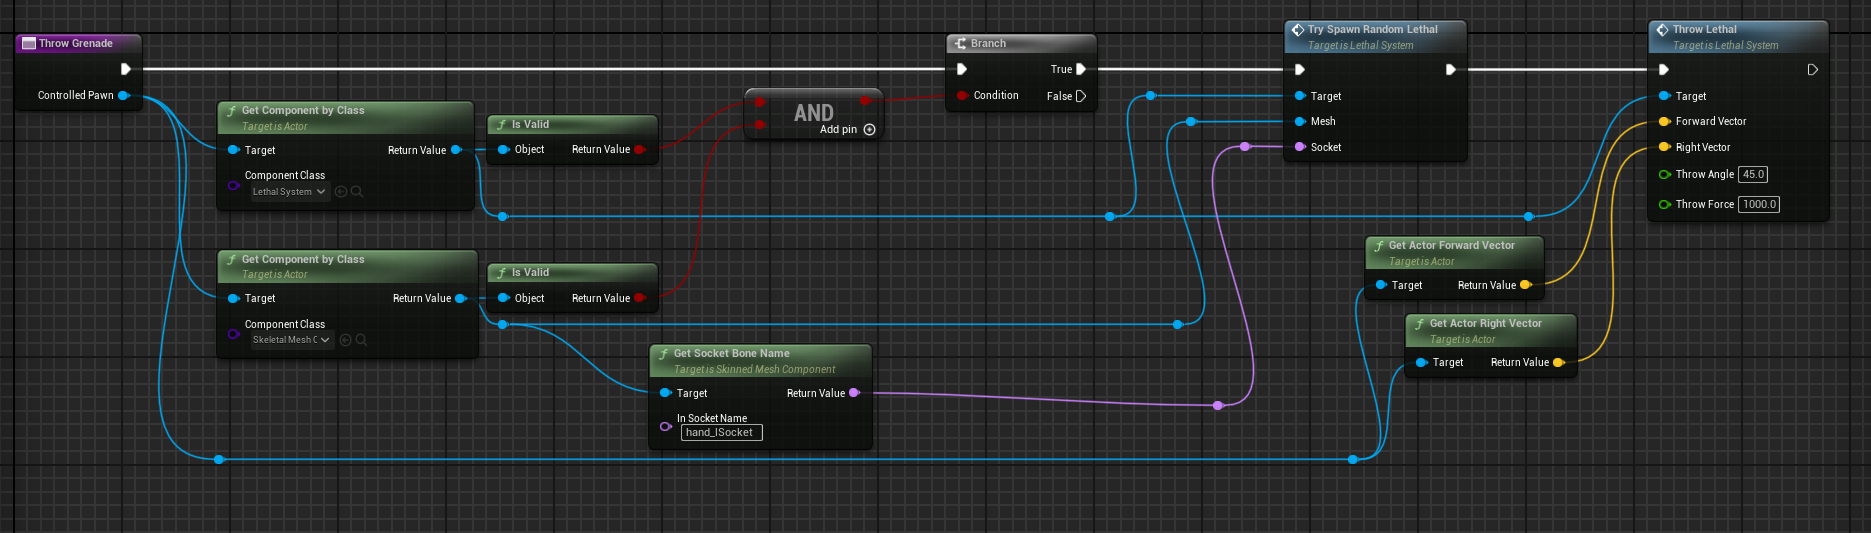 But both use the same internal implementation

LethalComponent Component Hierarchy
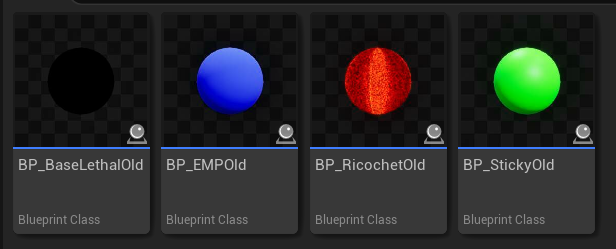
The base LethalComponent is a convenient base class for anything that exhibits grenade-like functionality, and with it’s default settings, operates like a prototypical frag grenade.
Any more complicated grenade effects, like for instance the R1C0CH3-T grenade, are able to override the base class with their specific functionality for each event.
Early on in development, the LethalSystem operated solely on blueprints derived from a blueprint called BP_BaseLethal. However, the plan then arose (and was later scrapped) to have gun pickups be tossable for an explosion after running out of ammunition.
Since this functionality is esentially a grenade, it would be nice to reuse the existing LethalSystem. The guns already had a class hierarchy however. This exposed a mistake in the original grenade system, where the grenade functionality was tightly coupled to one specific blueprint.
 After a refactoring, the lethal blueprints are simply the geometry, visuals, and a particular child of
 LethalComponent. This allows any functionality to be easily attached to anything that needs to be “grenade-like”.
 Additionally, the
 LethalSystem was made to operate on LethalComponent-derived things for some functionality, but anything not grenade specific uses a Throwable Interface instead.
If the situation demanded any expansion of functionality past grenades, this system would be easily expandable.
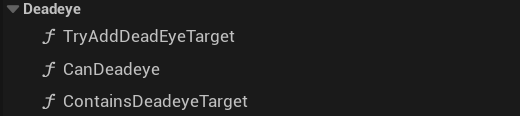
Deadeye Ability and System
In order to make gameplay more dynamic and reward the player for utilizing their movement skills, Project Mercury includes a special skill called Deadeye. As the player uses their movement system, they are rewarded points, depending on their skill in using the movement ability, as well as their skill in chaining together movement skills without interruption.
The Deadeye system functions by subscribing to delegates on the aforementioned player controller, which listen for each movement skill, and checking on a movement mode change to see if the combo has broken.
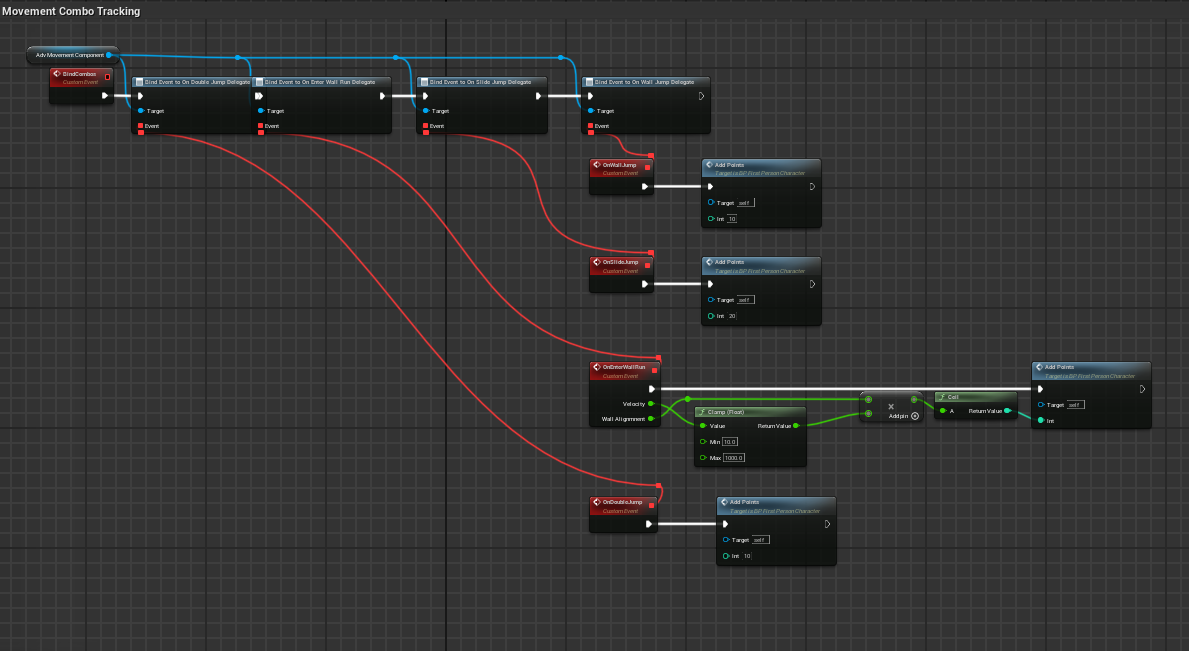 It tracks the current combo count and calulates the actual points to add based on the combo.
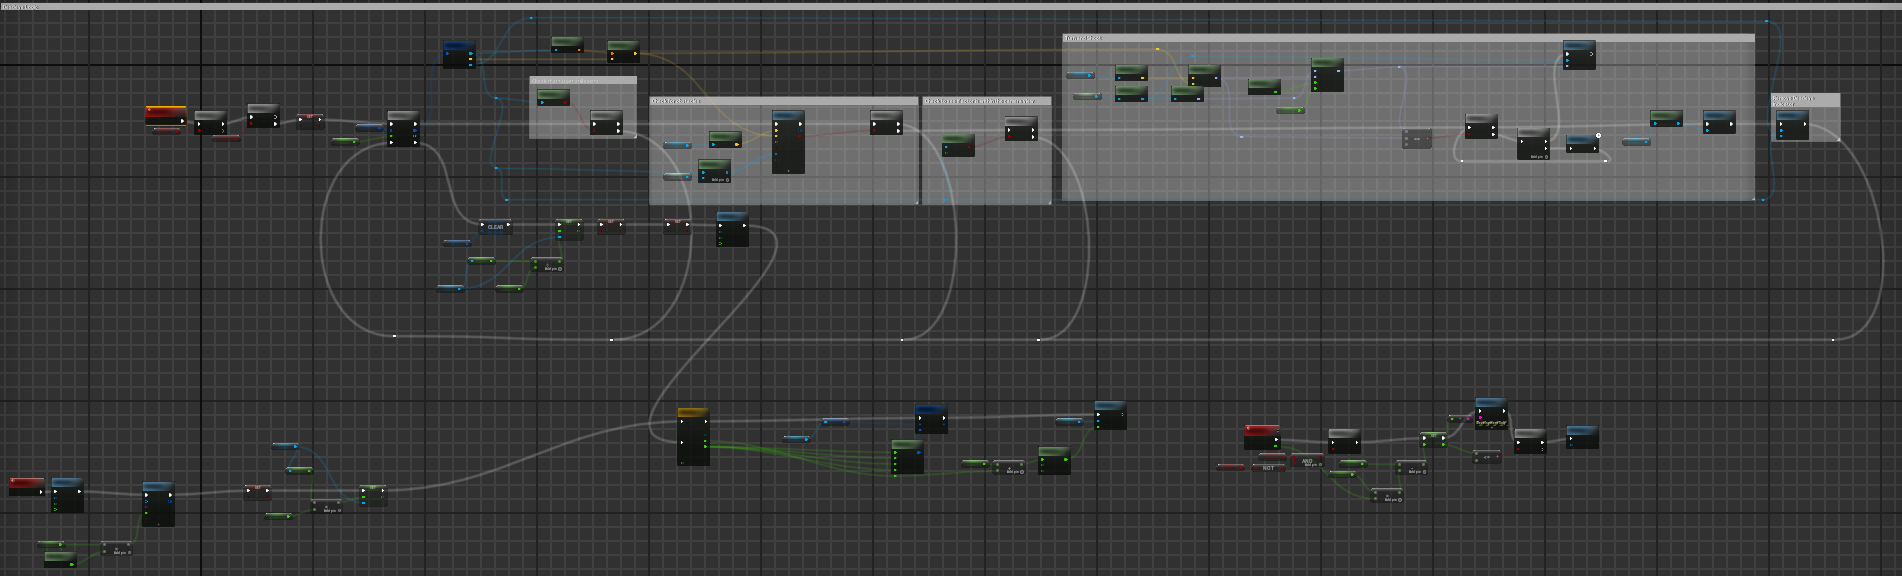
 The actual deadeye ability is a combination of helper functions and one behemoth event graph routine.
This is responsible for camera effects, moving the view to each target, and shooting.
Miscellaneous
A brief mention on some other tasks I worked on.
Environment Searchlight Drones
In addition to the pre-set spline-based environmental drones, I wanted to make the environment feel more hostile. I created a very simple and partially random searchlight drone system. By simply placing down points-of-interest in the level, designers can create areas that drones will randomly move between and investigate. My goal was to create a sense of being hunted. Like the other environmental drones, they can be shot to explode, to help tutorialize the player.
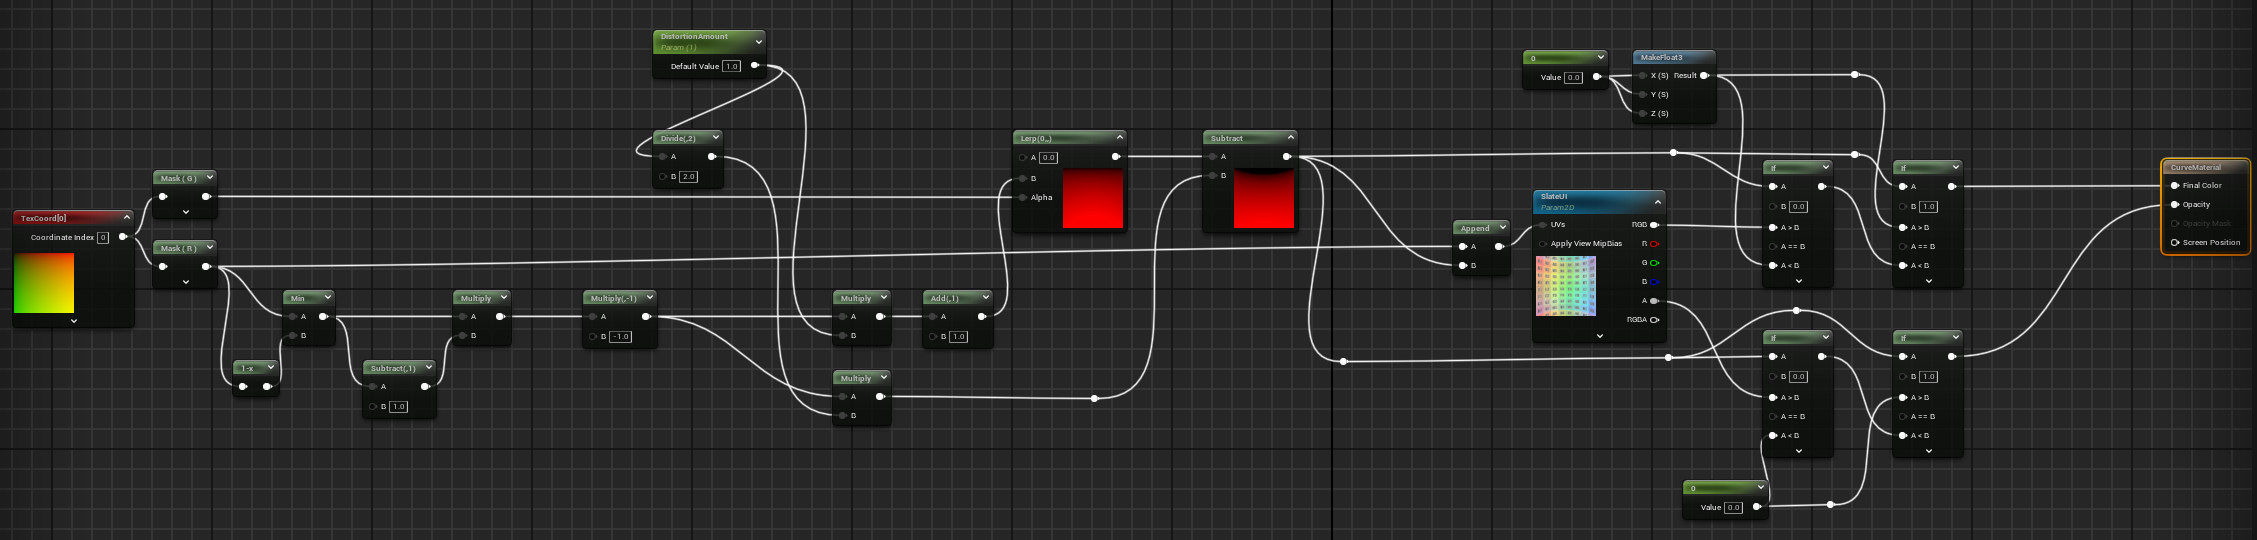
Curved UI Material
In order to create the feeling of the HUD being projected in front of the player on a helmet interior, we wanted to have a curve to the UI elements. I wasn’t satisifed with any of the existing tutorials I could find, so armed with my nearly non-existant knowledge of shader code, I tried my hand at making my own from scratch. I was able to get something I was pretty happy with.
Takeaways and the Future
Over the course of this project, I’ve of course learned a lot about developing with Unreal Engine 5, and the differences and tradeoffs it has compared to all of my previous experience with Unity.
To me, Unity is a sandbox, and everything is there for you to do. But by the same token, everything there is to be done by you. As an engine, Unreal is a much more complicated beast.
But due to that, you also get so much nicer defaults in every corner of the engine. For instance, with networking. I’m under the impression, it’s been a weak spot of Unity until quite recently. But in Unreal, a lot of it is just there, ready to be used.
The player controller I developed, because it fit into the Unreal Gameplay Framework, had networked support for the first chunk of this project. It’s only due to time constraints that I didn’t keep on-top of making it stay that way. As an aside, getting the rest of the new state I created replicated is definitely something I want to finish up in the future.
Because of this dichotomy, when it comes to technical skills, I feel that I lot of what I learned this semester was just me learning the “Unreal Way” of getting it done.
That’s not to say I didn’t overall learn a lot and improve as a game developer. I feel like I’ve gained the bedrock knowledge needed to make the next game I work on a highly polished and extremely robust machine.
I learned about creating lower-level but still extensible systems from working on the character movement component, creating super adapatable gameplay systems from creating the lethal system, more than I thought possible about how the engine works from trying (and mostly failing) to optimize our framerates, how to get along with and work together with such a big (for me) team, and so much more in the gaps.
In the end, I’m so glad I got the opportunity to expand my skills and knowledge in this new engine.
My interest remains in challenging myself, taking on the tough problems, and creating systems to solve them. In the short term, I’d like to continue working with Unreal, and put every single thing I learned into making something even bigger and better.
Thanks! 👋